2022-02-19 23:17:15 +01:00
|
|
|
# Configuration
|
|
|
|
|
|
|
|
|
|
## Environment Variables
|
|
|
|
|
|
|
|
|
|
`cp .env.example .env`
|
|
|
|
|
|
|
|
|
|
then fill the `.env` file with your variables:
|
|
|
|
|
|
|
|
|
|
- `USER_ID`: ID of the user to use in Docker containers, defaults to `1000`
|
|
|
|
|
- `GROUP_ID`: ID of the user group to use in Docker containers, defaults to `1000`
|
|
|
|
|
- `TIMEZONE`: for the containers, defaults to `America/New_York`
|
2022-04-20 21:33:22 +02:00
|
|
|
- `DATA_ROOT`: host location of the data files, defaults to `/mnt/data`
|
|
|
|
|
- `DOWNLOAD_ROOT`: host download location for qBittorrent, should be a subfolder of `DATA_ROOT`, defaults to `/mnt/data/torrents`
|
2022-02-19 23:17:15 +01:00
|
|
|
- `PIA_LOCATION`: servers to use for PIA, defaults to `ca`, ie Montreal, Canada with port forwarding support
|
|
|
|
|
- `PIA_USER`: PIA username
|
|
|
|
|
- `PIA_PASS`: PIA password
|
2022-04-20 21:33:22 +02:00
|
|
|
- `PIA_LOCAL_NETWORK`: PIA local network
|
2022-02-19 23:17:15 +01:00
|
|
|
|
|
|
|
|
## PIA Wireguard VPN
|
|
|
|
|
|
|
|
|
|
I chose PIA since it supports Wireguard and [port forwarding](https://github.com/thrnz/docker-wireguard-pia/issues/26#issuecomment-868165281),
|
|
|
|
|
but you could use other providers:
|
|
|
|
|
|
|
|
|
|
- OpenVPN: [linuxserver/openvpn-as](https://hub.docker.com/r/linuxserver/openvpn-as)
|
|
|
|
|
- Wireguard: [linuxserver/wireguard](https://hub.docker.com/r/linuxserver/wireguard)
|
|
|
|
|
- NordVPN + OpenVPN: [bubuntux/nordvpn](https://hub.docker.com/r/bubuntux/nordvpn/dockerfile)
|
|
|
|
|
- NordVPN + Wireguard (NordLynx): [bubuntux/nordlynx](https://hub.docker.com/r/bubuntux/nordlynx)
|
|
|
|
|
|
2022-04-18 00:59:35 +02:00
|
|
|
For PIA + Wireguard, fill `.env` and fill it with your PIA credentials.
|
2022-02-19 23:17:15 +01:00
|
|
|
|
|
|
|
|
The location of the server it will connect to is set by `LOC=ca`, defaulting to Montreal - Canada.
|
|
|
|
|
|
|
|
|
|
## Sonarr & Radarr
|
|
|
|
|
|
|
|
|
|
### File Structure
|
|
|
|
|
|
|
|
|
|
Sonarr and Radarr must be configured to support hardlinks, to allow instant moves and prevent using twice the storage
|
|
|
|
|
(Bittorrent downloads and final file). The trick is to use a single volume shared by the Bittorrent client and the *arrs.
|
|
|
|
|
Subfolders are used to separate the TV shows from the movies.
|
|
|
|
|
|
|
|
|
|
The configuration is well explained by [this guide](https://trash-guides.info/Hardlinks/How-to-setup-for/Docker/).
|
|
|
|
|
|
|
|
|
|
In summary, the final structure of the shared volume will be as follows:
|
|
|
|
|
|
|
|
|
|
```
|
|
|
|
|
data
|
|
|
|
|
├── torrents = shared folder qBittorrent downloads
|
|
|
|
|
│ ├── movies = movies downloads tagged by Radarr
|
|
|
|
|
│ └── tv = movies downloads tagged by Sonarr
|
|
|
|
|
└── media = shared folder for Sonarr and Radarr files
|
|
|
|
|
├── movies = Radarr
|
|
|
|
|
└── tv = Sonarr
|
|
|
|
|
```
|
|
|
|
|
|
|
|
|
|
Go to Settings > Management.
|
|
|
|
|
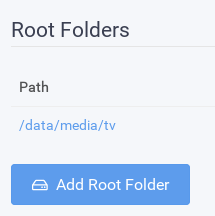
In Sonarr, set the Root folder to `/data/media/tv`.
|
|
|
|
|
In Radar, set the Root folder to `/data/media/movies`.
|
|
|
|
|
|
|
|
|
|

|
|
|
|
|
|
|
|
|
|
### Download Client
|
|
|
|
|
|
|
|
|
|
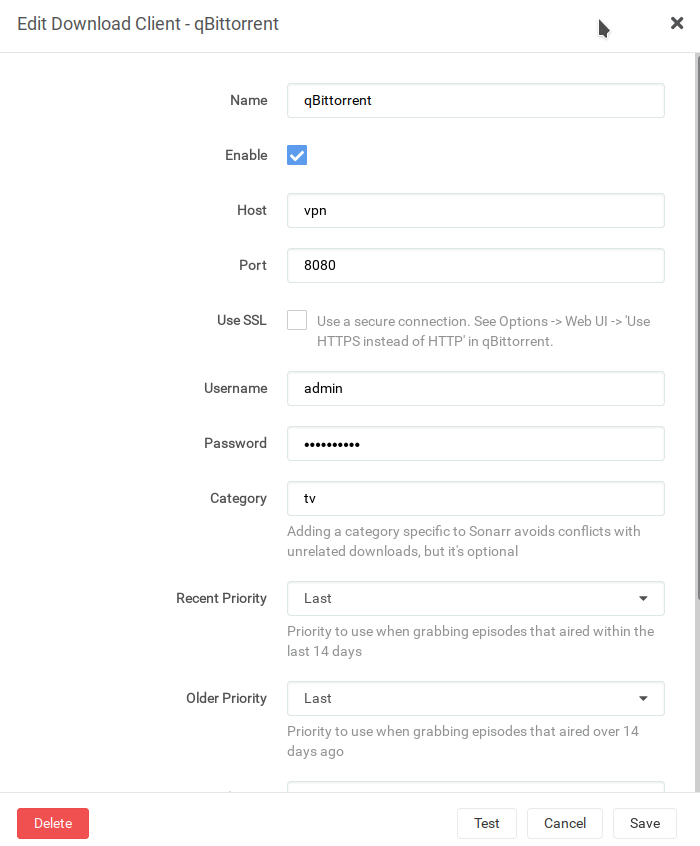
Then qBittorrent can be configured at Settings > Download Clients. Because all the networking for qBittorrent takes
|
|
|
|
|
place in the VPN container, the hostname for qBittorrent is the hostname of the VPN container, ie `vpn`, and the port is `8080`:
|
|
|
|
|
|
|
|
|
|

|
|
|
|
|
|
|
|
|
|
## Prowlarr
|
|
|
|
|
|
|
|
|
|
The indexers are configured through Prowlarr. They synchronize automatically to Radarr and Sonarr.
|
|
|
|
|
|
2022-12-31 01:05:22 +01:00
|
|
|
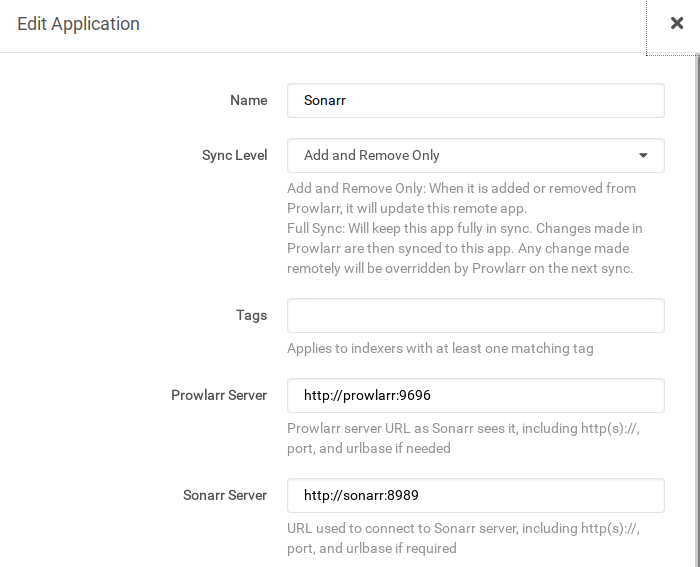
Radarr and Sonarr may then be added via Settings > Apps. The Prowlarr server is `http://prowlarr:9696/prowlarr`, the Radarr server
|
2022-04-18 00:59:35 +02:00
|
|
|
is `http://radarr:7878/radarr` and Sonarr `http://sonarr:8989/sonarr`:
|
2022-02-19 23:17:15 +01:00
|
|
|
|
|
|
|
|

|
|
|
|
|
|
|
|
|
|
Their API keys can be found in Settings > Security > API Key.
|
|
|
|
|
|
|
|
|
|
## qBittorrent
|
|
|
|
|
|
|
|
|
|
Set the default save path to `/data/torrents` in Settings:
|
|
|
|
|
|
|
|
|
|

|
|
|
|
|
|
|
|
|
|
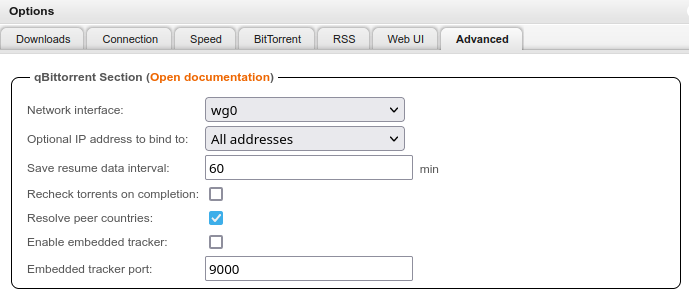
Restrict the network interface to Wireguard:
|
|
|
|
|
|
|
|
|
|

|
|
|
|
|
|
|
|
|
|
The web UI login page can be disabled on for the local network in Settings > Web UI > Bypass authentication for clients
|
|
|
|
|
|
|
|
|
|
```
|
|
|
|
|
192.168.0.0/16
|
|
|
|
|
127.0.0.0/8
|
|
|
|
|
172.17.0.0/16
|
|
|
|
|
```
|
|
|
|
|
|
2023-02-13 06:42:29 +01:00
|
|
|
## Jellyfin
|
|
|
|
|
|
|
|
|
|
To enable [hardware transcoding](https://jellyfin.org/docs/general/administration/hardware-acceleration/),
|
|
|
|
|
depending on your system, you may need to update the following block:
|
|
|
|
|
|
|
|
|
|
```
|
|
|
|
|
devices:
|
|
|
|
|
- /dev/dri/renderD128:/dev/dri/renderD128
|
|
|
|
|
- /dev/dri/card0:/dev/dri/card0
|
|
|
|
|
```
|
|
|
|
|
|
|
|
|
|
Generally, running Docker on Linux you will want to use VA-API, but the exact mount paths may differ depending on your
|
|
|
|
|
hardware.
|
|
|
|
|
|
2022-02-19 23:17:15 +01:00
|
|
|
## Heimdall
|
|
|
|
|
|
2022-04-18 00:59:35 +02:00
|
|
|
Applications can be added in Items > Add. The URLs should be the static IP, ie: `http://192.168.0.10/` for Sonarr
|
2022-02-19 23:17:15 +01:00
|
|
|
for example.
|
|
|
|
|
|
|
|
|
|

|
2022-12-31 01:05:22 +01:00
|
|
|
|
|
|
|
|
## Traefik and SSL Certificates
|
|
|
|
|
|
|
|
|
|
While you can use the private IP to access your NAS, how cool would it be for it to be accessible through a subdomain
|
|
|
|
|
with a valid SSL certificate?
|
|
|
|
|
|
|
|
|
|
Traefik makes this trivial by using Let's Encrypt and one of its
|
|
|
|
|
[supported ACME challenge providers](https://doc.traefik.io/traefik/https/acme/).
|
|
|
|
|
|
|
|
|
|
Let's assume we are using `nas.domain.com` as custom subdomain.
|
|
|
|
|
|
|
|
|
|
The idea is to create an A record pointing to the private IP of the NAS, `192.168.0.10` for example:
|
|
|
|
|
```
|
|
|
|
|
nas.domain.com. 1 IN A 192.168.0.10
|
|
|
|
|
```
|
|
|
|
|
|
|
|
|
|
The record will be publicly exposed but not resolve given this is a private IP.
|
|
|
|
|
|
|
|
|
|
Given the NAS is not accessible from the internet, we need to do a dnsChallenge.
|
|
|
|
|
Here we will be using CloudFlare, but the mechanism will be the same for all DNS providers
|
|
|
|
|
baring environment variable changes, see the Traefik documentation above and [Lego's documentation](https://go-acme.github.io/lego/dns/).
|
|
|
|
|
|
|
|
|
|
Then, we need to fill the `.env` entries:
|
|
|
|
|
|
|
|
|
|
- `HOSTNAME`: the subdomain used, `nas.domain.com` for example
|
|
|
|
|
- `LETS_ENCRYPT_EMAIL`: e-mail address used to send expiration notifications
|
|
|
|
|
- `CLOUDFLARE_EMAIL`: Account email
|
|
|
|
|
- `CLOUDFLARE_DNS_API_TOKEN`: API token with DNS:Edit permission
|
|
|
|
|
- `CLOUDFLARE_ZONE_API_TOKEN`: API token with Zone:Read permission
|
|
|
|
|
|
|
|
|
|
If you want to test your configuration first, use the Let's Encrypt staging server by uncommenting this:
|
|
|
|
|
```
|
|
|
|
|
#- --certificatesresolvers.myresolver.acme.caserver=https://acme-staging-v02.api.letsencrypt.org/directory
|
|
|
|
|
```
|
|
|
|
|
|
|
|
|
|
If it worked, you will see the staging certificate at https://nas.domain.com.
|
|
|
|
|
You may remove the `./letsencrypt/acme.json` file and restart the services to issue the real certificate.
|
|
|
|
|
|
|
|
|
|
### Accessing from the outside
|
|
|
|
|
|
|
|
|
|
If we want to make it reachable from outside the network without opening ports or exposing it to the internet, I found
|
|
|
|
|
[Tailscale](https://tailscale.com/) to be a great solution: create a network, run the client on both the NAS and the device
|
|
|
|
|
you are connecting from, and they will see each other.
|
|
|
|
|
|
|
|
|
|
In this case, the A record should point to the IP Tailscale assigned to the NAS, eg `100.xxx.xxx.xxx`:
|
|
|
|
|
```
|
|
|
|
|
nas.domain.com. 1 IN A 100.xxx.xxx.xxx
|
|
|
|
|
```
|
|
|
|
|
|
|
|
|
|
See [here](https://tailscale.com/kb/installation/) for installation instructions.
|
|
|
|
|
|
|
|
|
|
However, this means you will always need to be connected to Tailscale to access your NAS, even locally.
|
|
|
|
|
This can be remedied by overriding the DNS entry for the NAS domain like `192.168.0.10 nas.domain.com`
|
|
|
|
|
in your local DNS resolver such as Pi-Hole.
|
|
|
|
|
|
|
|
|
|
This way, when connected to the local network, the NAS is accessible directly from the private IP,
|
|
|
|
|
and from the outside you need to connect to Tailscale first, then the NAS domain will be accessible.
|